Tuesday, October 26, 2010

Halloween Treats #5 - Chocolate Candy Corn Truffles

Dark chocolate and bitter orange offset the sweetness of candy corn in these fun but fancy truffles. Prep and Cook Time: about 30 minutes, plus at least 2 1/2 hours to chill. Notes: You'll need 64 fluted 1-in. paper candy cups for this recipe.
 
Yield: Makes 64 truffles


Ingredients

  • 18  ounces  bittersweet chocolate, finely chopped
  • 1  cup  whipping cream
  • 1 1/2  tablespoons  Grand Marnier or other orange liqueur
  • 1/4  cup  orange marmalade
  • 1/4  cup  unsweetened cocoa powder (not Dutch-processed)
  • 64  candy corns (about 3 oz.)

Preparation

1. Line an 8- by 8-in. baking pan with a 12- by 17-in. sheet of foil or waxed paper.
2. In a large heatproof bowl set over a saucepan of hot water, use a heatproof spatula or wooden spoon to stir together chocolate, cream, Grand Marnier, and marmalade until chocolate is melted. Scrape chocolate mixture into prepared pan, smoothing top.
3. Chill until firm, at least 2 1/2 hours or (covered with plastic wrap) up to 1 week.
4. Put cocoa powder in a shallow bowl. Remove chocolate mixture from pan. With a long, sharp knife, cut chocolate mixture into 64 squares, each about 3/4 in. wide. Roll squares in cocoa powder to coat; place 1 square in each paper cup.
5. Gently press a candy corn into the top of each truffle. Store between sheets of waxed paper in an airtight container in the refrigerator for up to 2 weeks.

Friday, October 22, 2010

Halloween Treats#4 - Spooky spider eggs

No recipe - I figure everyone has their own favorite on this... but the design is cute for us Big Kids:)

Thursday, October 14, 2010

Halloween Treats #3 - Tombstone Cookies

Yield: Makes about 2 1/2 dozen

Ingredients

  • 2  tablespoons  cocoa (or cacao) nibs (see Notes)
  • 6  tablespoons  butter, softened
  • 1/2  cup  sugar, plus extra for sprinkling cookies
  • 1  large egg
  • 1/2  teaspoon  vanilla
  • 1 1/3  cups  all-purpose flour
  • 1/2  teaspoon  baking powder
  • 1/4  teaspoon  salt
  • Melted semisweet or bittersweet chocolate


Preparation

1. Preheat oven to 400°. In a blender, whirl cocoa nibs until each is about the size of a grain of rice.
2. In the large bowl of an electric mixer, beat butter and 1/2 cup sugar until creamy; beat in egg and vanilla.
3. In another bowl, whisk together flour, baking powder, salt, and cocoa nibs; gradually add to butter mixture, blending thoroughly, to form a soft dough. Divide dough into thirds, cover each portion tightly with plastic wrap, and refrigerate until firm (at least 1 hour), or up to 3 days.
4. On a floured board, roll out dough, a portion at a time, to a thickness of 1/8 in. (keep dough refrigerated when not in use). With a sharp knife, cut out free-form tombstone shapes (about 1 1/2 by 3 in.; cut bottom edges at an angle to make them easier to poke into the pots de crème), and place slightly apart on ungreased baking sheets. Sprinkle generously with sugar.
5. Bake cookies until edges are lightly browned, about 8 to 10 minutes. Transfer to racks and let cool completely before handling.
6. Using a pastry bag with a very fine tip, pipe the letters "RIP" in chocolate on at least 8 of the cookies. Stick these cookies into the Dark Chocolate Graveyard Pots de Crème and serve the rest of the cookies alongside.

Tuesday, October 5, 2010

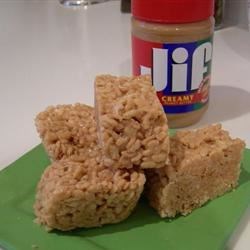
Halloween Treats #2 - Jif® Crispy Treats (Decorate for the Season)

A great twist on an old classic!

Ingredients

  • CRISCO® Original No-Stick Cooking Spray
  • 3 tablespoons butter or margarine
  • 1 (10 ounce) package marshmallows
  • 1/2 cup JIF® Creamy Peanut Butter
  • 6 cups crisp rice cereal
Optional items:
  • M&Ms
  • Orange and Black Squeezable Frosting
  • Stick Pretzels

 Directions

  1. Spray a 13 x 9-inch baking pan with no-stick spray.
  2. Melt butter or margarine in large saucepan on low heat. Add marshmallows. Stir until completely melted. Remove from heat.
  3. Add peanut butter. Stir until well blended. Add cereal. Stir until well coated.
  4. Press into buttered pan. Cool completely. Cut into 24 pieces. 
Decorate with black and orange frosting for Halloween. You can add eyes with M&Ms and legs with pretzels too!

Wednesday, September 22, 2010

Halloween Treats #1

What you will need to make great sugar skulls:

  • Granulated Sugar (adjust amount depending on how many sugar skulls you will be making. Approximately 1 cup per 6 small sugar skulls, 4 medium or 1 large whole sugar skull.)
  • Large bowl
  • Water
  • Sugar Skull molds (shape and size of your preference. (Some are faces only and some include two parts that you put together to make a whole skull.)
  • Meringue powder, 1 teaspoon for each cup of sugar. (Helps to hold the sugar together.)
  • Powdered sugar for the sugar skull decorative icing.
  • Paste food coloring to color the icing.
  • Icing decorator bags
  • A large, dry area for the sugar skulls to dry in. (Once for the sugar to dry in the mold, and once for the icing to dry.)
  • Any other decoration you like such as foil, beads or feathers.
Directions:
For every cup of sugar, mix in 1 teaspoon of meringue powder and sprinkle 1 teaspoon of water on top. Work the water into the sugar with your fingers until the mixture feels like cool beach sand. This takes a few minutes, so be patient. The sugar is ready when you can press your finger or thumb into it and the print will stay.

Fill the mold with sugar and press firmly with the palm of your hand. When the skull is full and pressed into mold, use the back of a knife to scrape off excess sugar and flatten back. Lightly re-press the scraped surface to smooth it.

Place a piece of cardboard or flat plate over the sugar skull. Hold the skull on the plate tightly and flip it over. Set the plate down and carefully remove the mold. Let the skulls dry for 12-24 hours.

In a large mixer, mix 2/3 cup water, 1/2 cup meringue powder and 2 pounds of powdered sugar until icing peaks or about 9 minutes.
Separate the icing into smaller portions (disposable cups and popsicle sticks work well for this) and use the paste food coloring to color the icing.
Place the icing in the icing decorator bags. Snip the end of each bag when you're ready to decorate. Start very small with the snip, you can make it bigger if necessary.

Use your icing to decorate the skulls. If you're adding foil, beads or feathers, use the icing as a glue to attach them. If you add non-edible items to the skull, do not attmept to eat it! Note- If you have any larger 2-piece skulls, use the icing to "glue" the pieces together.

Let the icing dry until it becomes hard. Then you can touch and display them as you like.

Sugar Skull Tips:
  • Meringue powder cannot be omitted. Some people use egg white but with mixed results. Sometimes they do not want to dry.
  • Try to make sugar skulls on a very dry day. If it is too humid outside, they may not dry well. If this happens put them in a warm oven for 2 hours to see if that helps.
  • For the larger skulls, you may scoop out some of the front and back pieces to make the finished skull lighter. Let the skull dry for 2 hours, then scoop out a hole in each one leaving a 1/2 inch solid flat border around the edge to glue them together. The scoopings may be re-used to make more skulls.
  • Lightly spritz sugar with water if sugar gets to dry while working.

Monday, September 20, 2010

Mexican Raviolis

 I haven't had a chance to make these yet - once I do I will post a picture! But they sound amazing!

Ingredients

  • 2 links chorizo sausage, cut into small pieces
  • 1/2 cup part-skim ricotta cheese
  • 1 cup shredded queso asadero (white Mexican cheese)
  • 1/2 cup chopped cilantro
  • 1 clove garlic, finely minced
  • 1/2 teaspoon cumin
  • 1 teaspoon salt
  • 1 (14 ounce) package round wonton wrappers
  • 1 teaspoon olive oil
  • 1 tablespoon salt

Directions

  1. Add chorizo to a hot skillet set over medium heat; cook, stirring, until cooked through. Set aside to cool.
  2. In a large bowl, stir together ricotta, queso asadero, cilantro, garlic, cumin, and salt.
  3. Place chorizo in a blender or food processor, and pulse until finely ground. Pour combined ingredients into blender, and pulse until well blended.
  4. Place a teaspoonful of filling on a wonton wrapper. Dip a finger in water, and wet the top half edge of the wrapper. Fold in half, and pinch the edges to seal. Set aside, and continue filling and sealing the remaining wrappers.
  5. Add oil and about 1 tablespoon salt to a pot of boiling water. Gently place raviolis into water, and cook until raviolis float to the top, about 6 minutes. Remove to plates with a slotted spoon, and serve topped with marinara sauce.

Thursday, September 16, 2010

Anybody Have Food Formulas They Want To Share?

Please send me your favorite food formulas to share with everyone! Send em the recipe, a picture of the finished product and of yourself if you want!!

Thanks For Sharing!!

ask.juliana@gmail.com

Wednesday, September 8, 2010

Strawberry Oatmeal Bars

I made these and everybody loved them - So Bon Appetite!

Ingredients

  • 1 1/4 cups all-purpose flour
  • 1 1/4 cups quick cooking oats
  • 1/2 cup sugar
  • 1/2 teaspoon baking powder
  • 1/4 teaspoon salt
  • 3/4 cup butter or margarine, melted
  • 2 teaspoons vanilla extract
  • 1 cup strawberry preserves
  • 1/2 cup flaked coconut

Directions

  1. In a bowl, combine dry ingredients. Add butter and vanilla; stir until crumbly. Set aside 1 cup. Press remaining crumb mixture evenly into an ungreased 13-in.x 9-in. x 2-in. baking pan. Spread preserves over crust. Combine coconut and reserved crumb mixture; sprinkle over preserves. Bake at 350 degrees F for 25-30 minutes or until coconut is lightly browned. Cool.

Saturday, September 4, 2010

Fluffy Peanut Butter Frosting

Ingredients

  • 1/2 cup butter, softened
  • 1 cup creamy peanut butter
  • 3 tablespoons milk, or as needed
  • 2 cups confectioners' sugar


Directions

  1. Place the butter and peanut butter into a medium bowl, and beat with an electric mixer. Gradually mix in the sugar, and when it starts to get thick, incorporate milk one tablespoon at a time until all of the sugar is mixed in and the frosting is thick and spreadable. Beat for at least 3 minutes for it to get good and fluffy.

Monday, August 16, 2010

Colorful Veggie Bake

 Ingredients:
  •     2 (16 ounce) packages frozen California blend vegetables, thawed
  •      8 ounces process cheese (eg. Velveeta), cubed
  •      6 tablespoons butter, divided
  •     1/2 cup crushed butter-flavored crackers


Directions:

1. Prepare vegetables according to package directions; drain. Place half in an ungreased 11-in. x 7-in. x 2-in. baking dish. In a small saucepan, combine cheese and 4 tablespoons butter; cook and stir over low heat until melted. Pour half over vegetables. Repeat layers.

2. Melt the remaining butter; toss with cracker crumbs. Sprinkle over the top. Bake, uncovered, at 325 degrees F for 20-25 minutes or until golden brown.

----------------------------------------------------------------------------
food in valencia
----------------------------------------------------------------------------

Tuesday, August 3, 2010

Let's Get This Party Started!

Welcome to my blog- Here I will share with you all sorts of recipes and health related things for all of us to better our lives and those we love. Everything from what to cook and where to buy you ingredients to health care and health care products,from coupons for band aids to wheelchairs.

We'll start this off with one of my favorite recipes!

 Blackberry cupcakes with blackberry frosting via Confessions of a Foodie Bride. These look delicious and seasonal, perfect for spring!


Blackberry Cupcakes with Blackberry Buttercream Frosting
3 6oz packs blackberries
1/3 cup milk, at room temperature
6 large egg whites, room temperature
2 tsp lemon juice
2 1/4 cup cake flour, sifted
1 3/4 cup sugar
4 tsp baking powder
1 tsp salt
12 Tbsp unsalted butter (1 1/2 sticks), softened
1 recipe Blackberry Buttercream Frosting, recipe follows

Preheat oven to 350 degrees and prepare two muffin pans with liners.
Puree blackberries in a food processor or blender. Scrape into a fine mesh sieve set over a bowl. With a rubber spatula, work the blackberries through the sieve, leaving seeds behind. Remove 1/4 cup of puree for the frosting. Your mileage may vary but you should have ~2/3 cup of blackberry puree leftover.
In small bowl, combine puree, milk, egg, vanilla and mix with fork until well blended. In bowl of stand mixer, add sifted flour, sugar, baking powder and salt and mix to combine. Continue beating at slow speed and add butter. Mix until combined and resembling moist crumbs.
Add liquids and beat at medium speed for about 1 minute or until full and evenly combined. Stop mixer to scrape down the sides of the bowl and beat for 30 more seconds. Fill cupcake liners ~3/4 full.
Bake for about 20 minutes or until a toothpick inserted in the center cupcake in each pan comes out clean. Let cupcakes cool in pans and then transfer to a covered plate.
Yields 24 cupcakes
Adapted from Cook’s Illustrated Classic White Layer Cake

Blackberry Buttercream Frosting
2 sticks butter unsalted butter, softened
1/2 tsp vanilla
1/4 tsp almond extract
5 cups confectioner’s sugar
1 Tbsp meringue powder
pinch of salt
1/4 cup blackberry puree
Cream butter and extracts until smooth. Mix in confectioner’s sugar, meringue powder, and salt and beat 2-3 minutes on high. Add blackberry puree and beat for an additional minute. Adjust consistency, if desired, with additional confectioner’s sugar or water.